Vermicomposting: How to Start Composting With Worms at Home
Worms are the heroes of healthy soil. Whether you love them or hate them, they’re essential to a healthy ecosystem. They’re also becoming increasingly known for their skill at composting food scraps, a process called vermicomposting.
Whether you’re curious about worms, want to be able to compost but don’t have much space, or just want to try a new method of composting, vermicomposting is a great option for you. The resulting worm castings, otherwise known as black gold, are incredibly rich in nutrients and microorganisms. Adding them to the garden is sure to make your plants thrive!
Luckily, vermicomposting is incredibly accessible, easy to do, and relatively inexpensive to get into compared to some other composting methods. Keep reading if you’re ready to learn more about vermicomposting, its benefits, and how to get started today!

Photo by Sippakorn Yamkasikorn
What is vermicomposting?
Vermicomposting is defined as the process of converting organic material into a soil amendment or fertilizer using earthworms. Unlike other methods of composting, vermicomposting is a “cold” method, which means that there is little to no heat created in the process.
Hot composting, on the other hand, relies on the activity of microorganisms such as bacteria to break down the organic matter and turn it into compost, releasing heat as a byproduct. In a good hot composting system, harmful organisms as well as weed seeds are destroyed, which is particularly important when composting materials such as lawn trimmings and manure.
On its own, vermicomposting is an incredibly viable method of composting, especially for food scraps that would otherwise be sent to the landfill. In addition, a simple vermicomposting system takes up very little room and can even fit under the kitchen sink, making it an excellent option for the apartment dweller yearning to compost!
What are red wiggler worms?
Typically, the type of worm used in vermicomposting systems is the red wiggler worm, Eisenia fetida. Red wigglers are voracious eaters—in fact, they’re able to eat as much as half of their body weight in food scraps per day!
Unlike the garden earthworm, red wigglers are surface dwellers (epigeic) that live in the top 6” of soil. In nature, this usually means decomposing organic matter such as leaf litter. In the home or commercial vermicomposting system, this means layers of bedding with food such as vegetable scraps or animal manure mixed in.
Red wigglers have no teeth, so food moves through the crop and gizzard, mixes with grit, and is turned into what we know as castings as it moves through the rest of the worm’s body and out the anus. These castings are rich with microorganisms that live in the worm’s gut.
A mature red wiggler worm is hermaphroditic, though it still needs another worm to reproduce. Reproducing worms form cocoons that look like small lemon-drop eggs from which 2-5 new worms will hatch. This means that the worm population in a vermicomposting system can grow quickly, increasing their ability to consume more and more organic matter. Talk about return on investment!
The benefits of vermicomposting
In nature, composting is a process that happens naturally all the time. Organic matter decomposes thanks to a whole host of organisms, including bacteria, fungi, nematodes, insects, and the trusty earthworms.
In the human world, we’ve lost touch with many of these natural processes. For example, did you know that food scraps make up 24% of waste in US landfills? We should all be striving to reduce food waste, and one way to do so is to compost it rather than toss it in the garbage, where it will rot (anaerobically) rather than decompose (aerobically).
All manner of composting is a great tool for addressing and mitigating food waste, whether at home or on the municipal level. Vermicomposting in particular can make composting more accessible particularly to apartment dwellers, who might not have access to a yard for implementing a more traditional compost system.
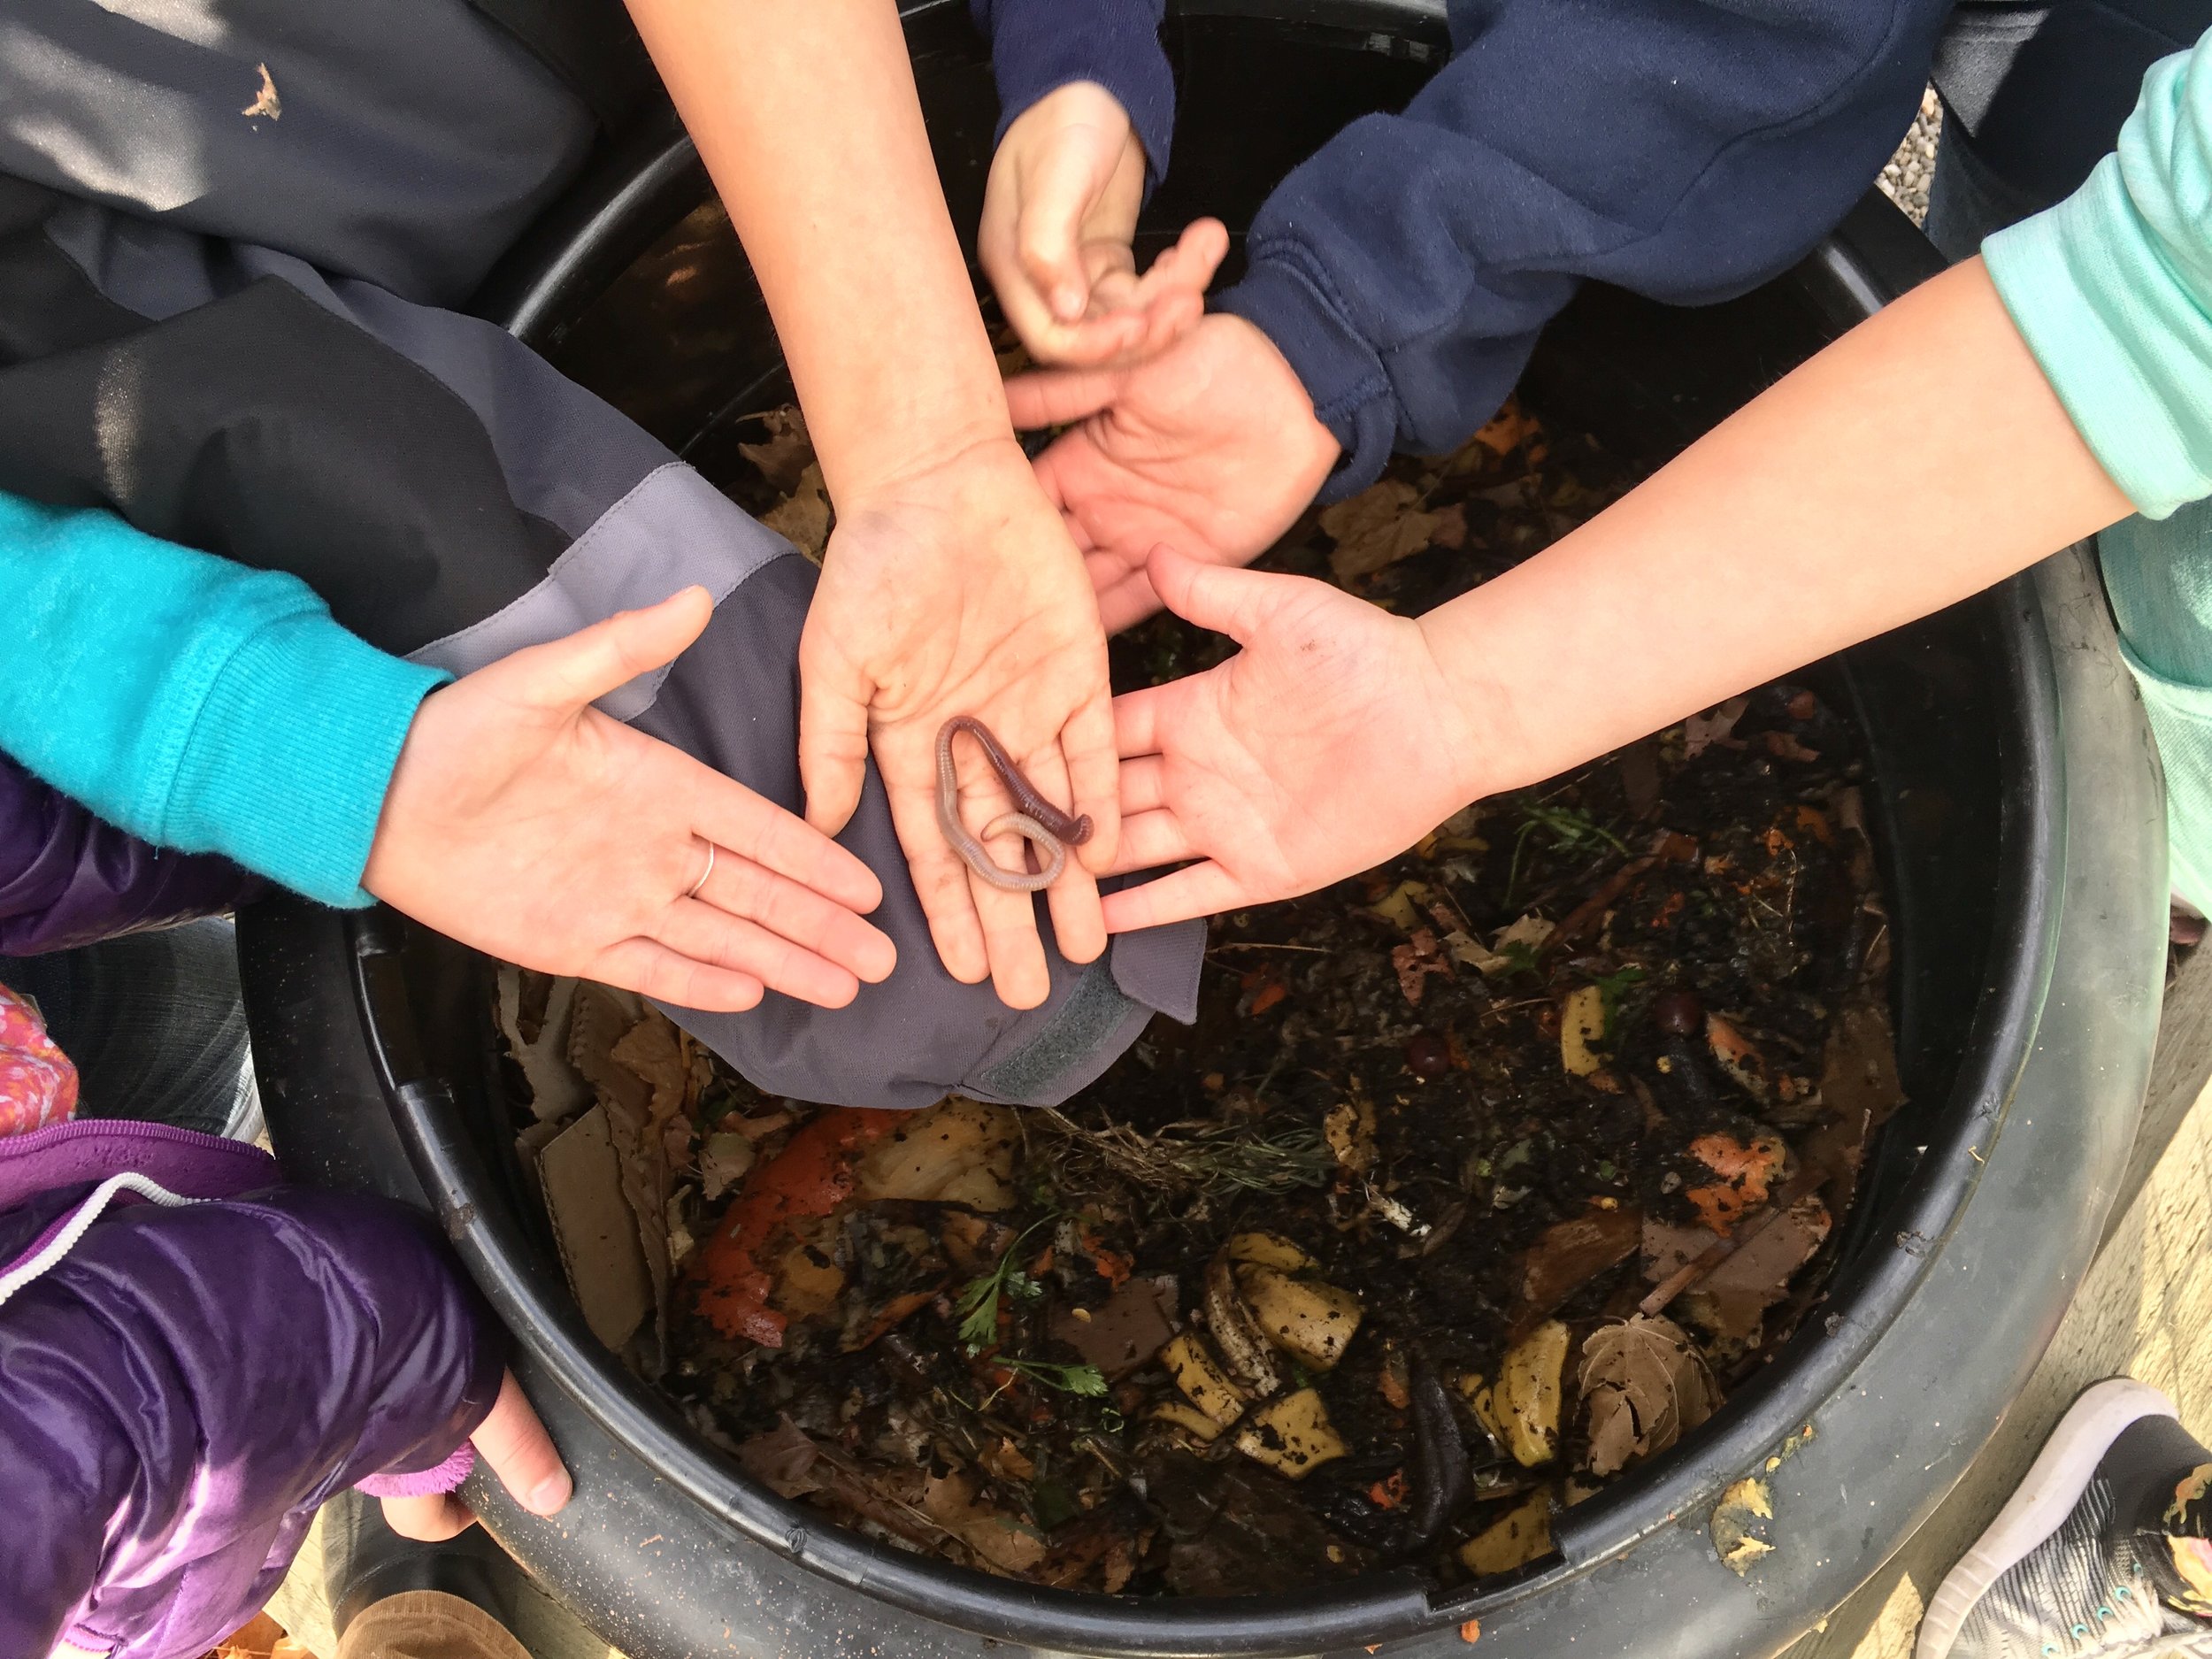
Moreover, vermicomposting shines as a tool for teaching kids about waste, compost, and soil. Kids are naturally enthralled by hands-on vermicomposting lessons. Additionally, worm bins are easy and inexpensive to make, and they are incredibly portable as a teaching tool.
That said, vermicomposting can be done by anyone, and it doesn’t necessarily have to be done inside, either. As long as you have food scraps to feed the worms, you can vermicompost!
How to start vermicomposting at home
Believe it or not, starting a worm farm at home is simple, easy, and affordable. As with anything, there’s a whole range of options to choose from, depending on your time and budget.
For example, you can easily build a DIY worm farm out of a few plastic tote bins, which is inexpensive, especially if you’ve already got some old bins laying around. For those looking to buy something pre-made, there are a lot of manufactured worm farms out there ranging in price and quality.
Even when it comes to the DIY worm farm, there isn’t just one method or design. However, in this article we’ll focus on the simplest, most space-efficient system that you can use to start vermicomposting at home today. All you need is a plastic bin and a drill to get started!
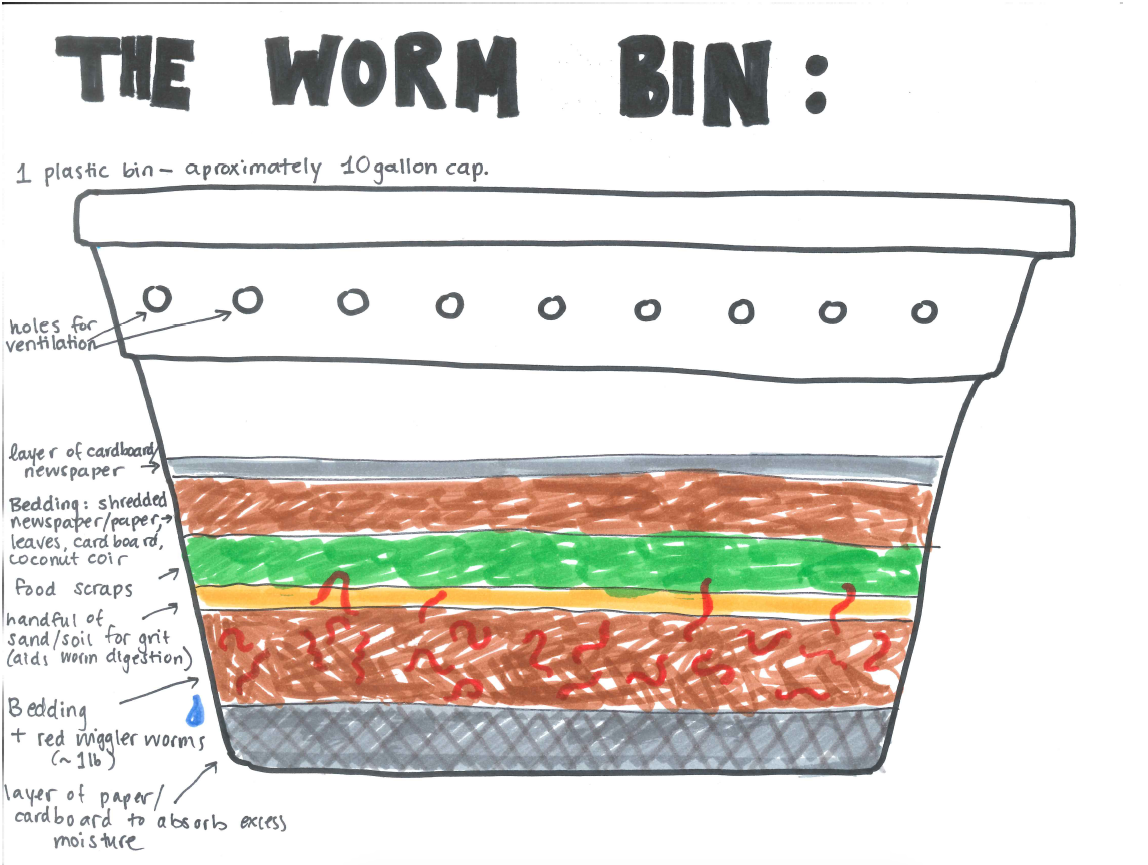
The DIY indoor vermicomposting bin
The simplest way to start a vermicomposting system at home is by transforming a plastic storage bin into a home for worms. Here’s how:
Step 1: Find a plastic storage bin. When starting out, look for a bin about 10 gallons in size, between 8-12 inches high, and with handles for ease of transport.
Step 2: Using a drill, punch holes in the lid and around the top edge of the bin about 1” apart to allow for air flow.
Step 3: Fill the bin with at least 6” of bedding, such as shredded newspaper, wood shavings, or coconut coir.
Step 4: Moisten the bedding. Don’t skip this step—you want the bedding moist, but not soggy. The worms require a moist environment in order to survive.
Step 5: Add the worms and a handful of ripe food scraps!
Step 6: Add more food scraps a few times per week, covering with at least 1” of bedding (either by adding new bedding on top or digging down to add the scraps).
See the following diagram for more detail:
Commonly asked questions:
How many worms should I get?
If you’re starting out with one worm bin, we recommend getting somewhere between ½ lb and 1 lb of red wiggler worms, or about 500-1000 count. Red wiggler worms eat at least 25-50% of their body weight per day, so if you start with 1 lb of worms, you’ll need to feed them at least ¼ lb per day.
Now, do a rough calculation to figure out how much you or your family produces in food scraps per day. That will tell you about how many worms you’ll need to compost all of your food scraps.
For example, if you produce about 2 lbs of food waste per week, then ½ lb of worms would probably be enough. If you’re a family of 4 with almost 8 lbs of food waste per week, you might consider getting a big enough bin to accommodate 2lbs of worms.
Keep in mind, the worms will also eat through their bedding, so the ratio of food to worms is not an exact science.
Pro tip: start smaller if you’re new to vermicomposting, so that you can find the right balance without risking the well-being of a large population of worms.
What kind of food scraps can I add?
For the most part, treat your worm bin as you would a regular composting system. You can add most fruit and vegetable scraps, but be sure to avoid animal products such as cheese and meat. Because too much acidity can be damaging to worms, it’s best to limit citrus peels.
Here’s a quick reference guide:

What is grit and do I need to add it to my worm farm?
Because worms don’t have teeth, they can only take small “bites” of soft foods. This is then crushed in the crop and gizzard as it’s mixed with grit. To keep your worms healthy, it’s best to make sure there’s some kind of grit available to them.
You can simply add a small amount of sand, cornmeal, coffee grounds, or crushed egg shells.
Are you ready to try vermicomposting at home? What other questions do you have? Let us know in the comments below!